🚦 What Is TDS and Why Does It Matter?
TDS (Traffic Distribution System) is the advanced layer inside CyberCloakTDS that goes beyond basic cloaking. While cloaking decides who sees the offer, TDS decides where they go. Instead of sending 100% of real traffic to a single offer link, TDS lets you split traffic across multiple offers, rotate URLs by weight, pass unique click IDs to affiliate networks, and get postback conversions reported back automatically.
If you are running paid campaigns on Facebook, TikTok, or Google and you want to track exactly which click converted and how much payout it generated — TDS is the feature you need.
🔧 Enabling TDS on a Flow
When editing a flow, scroll to the Traffic Splitting (TDS) section and toggle TDS ON. Once enabled, the Offer URL in the top section is ignored — traffic is controlled entirely by the TDS offer list you configure here.
⚠️ Important: After changing any TDS settings, you must re-download index.php from the flow row and re-upload it to your campaign domain. The file does not sync live — it is baked at download time.
🧪 Self-Testing with White IP List
By default, if your own IP is added to the White IP list in the flow, the cloaking engine treats you as a trusted visitor and bypasses all filters including TDS routing. This means:
- ✅ You will land directly on the offer page (first offer in the TDS list)
- ✅ No cloaking checks run — country, device, VPN filters are skipped
- ❌ No
click_idis generated for white IP visits - ❌ Postback tracking will not work for white IP test clicks
This is normal and correct behavior. White IP bypass is designed for quick visual testing — can you see the offer page — not for full conversion tracking tests. For end-to-end postback testing, use a real mobile device on a cellular connection that is not in the white IP list.
💡 Tip: To test TDS routing with a click_id generated, remove your IP from the white list temporarily, test from a mobile device or a proxy, then add it back.
📋 How Many Offers Can You Add?
You can add unlimited offers in the TDS section. Each offer has an Offer URL (your full affiliate link with tokens) and a Weight (%) which is the percentage of traffic this offer receives. The weights must add up to 100%. The panel auto-balances remaining offers when you change one weight.
⚖️ How Weight-Based Splitting Works
When a real visitor arrives and passes all filters, the TDS engine picks one offer using weighted random selection:
| Offer | Weight | Traffic Share |
|---|---|---|
| Offer 1 — Dr.Cash Keto India | 60% | 6 out of every 10 visitors |
| Offer 2 — Adcombo Keto India | 30% | 3 out of every 10 visitors |
| Offer 3 — Test Offer | 10% | 1 out of every 10 visitors |
The selection is random each visit — it is not round-robin. Over time, distribution converges to your configured percentages. This lets you A/B test multiple offers or networks on the same campaign without running separate flows.
🔗 What to Put in the Offer URL — Tokens Explained
When TDS sends a visitor to your offer URL, it replaces special token placeholders with real visitor data. Insert these tokens directly into your offer URL when setting up the flow.
Available Tokens
| Token | Replaced With | Example Value |
|---|---|---|
{click_id} |
Unique click ID generated for this visit | 6a2782df8f3c |
{sub1} — {sub5} |
Sub-parameters passed by the traffic source in the campaign URL | fb_adset_123 |
{country} |
2-letter country code of the visitor | IN |
{device} |
Visitor device type | mobile |
{os} |
Visitor operating system | android |
{ip} |
Visitor IP address | 103.21.58.12 |
{language} |
Browser language code | hi |
{isp} |
Internet Service Provider name | Airtel |
🛠️ How to Use the Token Buttons
In the TDS offer rows, each offer URL field has a row of token buttons below it. Click any token button to insert it at the cursor position in that offer URL. You do not need to type them manually.
📌 Click ID Parameter Field
The Click ID Parameter field sets the query parameter name used to pass the click ID. For example, set it to sub1 and click Apply to URLs — the system automatically appends ?sub1={click_id} to all offer URLs. Different affiliate networks use different parameter names:
| Network | Their Parameter | Your Offer URL Setup |
|---|---|---|
| Dr.Cash | sub1 |
https://offer-link.com/l?sub1={click_id} |
| AdCombo | sub_id |
https://offer-link.com/go?sub_id={click_id} |
| Binom / Keitaro | click_id |
https://tracker.com/go?click_id={click_id} |
| Voluum | vid |
https://offer-link.com/?vid={click_id} |
| Any network | Check their docs | Use whatever parameter name they specify |
The goal is always the same: pass your {click_id} to the network via the parameter name they expect, so when they fire a postback, they return that same value and you can match it back to the original click.
📡 What Is a Postback URL and How Does It Work?
A postback URL (also called S2S tracking or server-to-server postback) is a URL that the affiliate network calls when a conversion happens. Instead of relying on browser pixels (which can be blocked by ad blockers), the network server makes a direct HTTP request to your tracking server the moment a conversion event occurs.
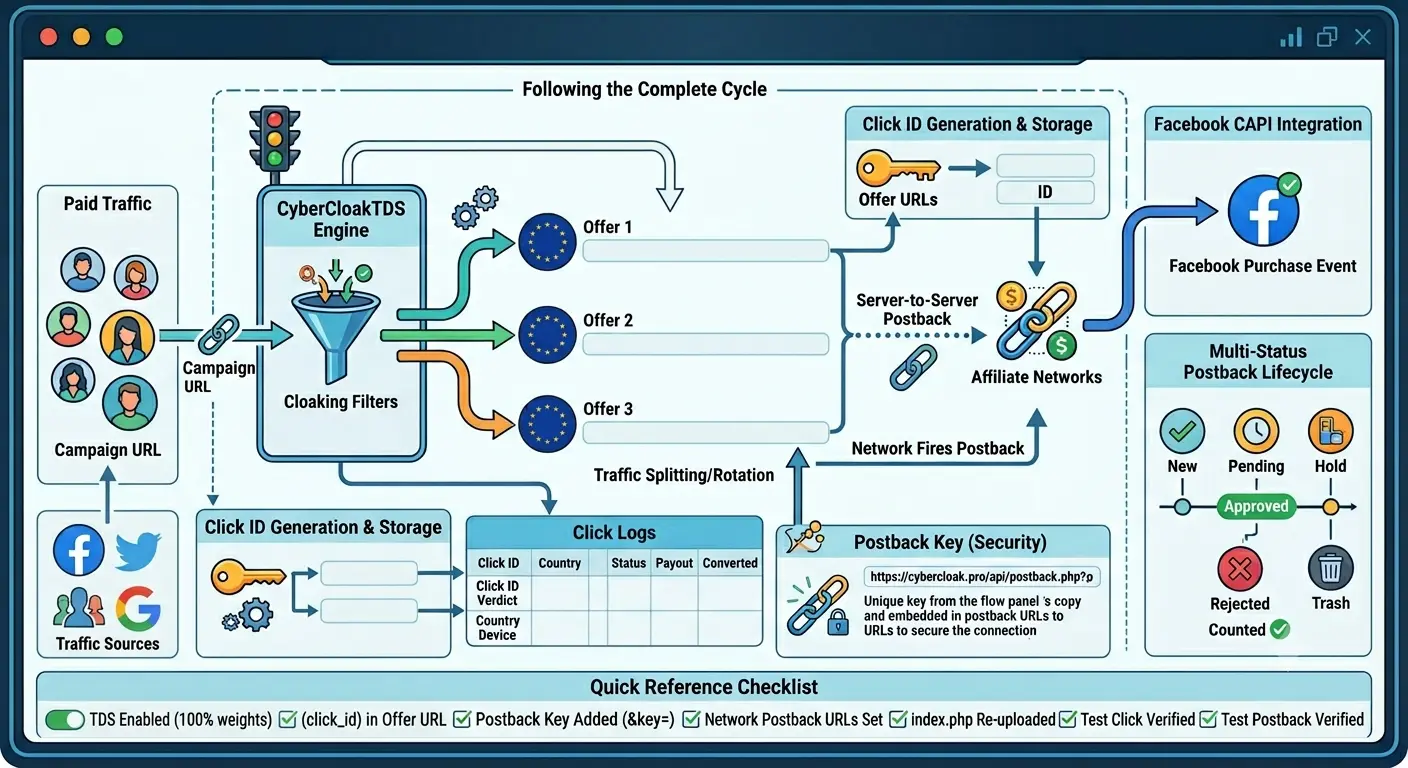
How the Full Cycle Works
- 🙋 Visitor hits your campaign URL → passes all cloaking filters → TDS engine runs
- 🔑 A unique
click_idis generated (e.g.6a2782df8f) and stored in Click Logs - 🔗 Visitor is sent to offer URL with your click_id embedded:
?sub1=6a2782df8f - 📋 Affiliate network receives the visitor, stores
sub1=6a2782df8falongside the click - ✅ Visitor converts (fills the form, makes a purchase, etc.)
- 📣 Network fires postback to:
https://cybercloak.pro/api/postback.php?cid=6a2782df8f&payout=21&status=approved&key=YOUR_KEY - 💾 CyberCloakTDS finds the click log row, marks
converted=1, stores payout, updates status
Your Postback URL Format
Give this URL to your affiliate network in their postback or S2S settings:
https://cybercloak.pro/api/postback.php?cid={NETWORK_SUB_MACRO}&payout={NETWORK_PAYOUT_MACRO}&status={NETWORK_STATUS_MACRO}&key=YOUR_POSTBACK_KEY{NETWORK_SUB_MACRO}→ macro your network uses to return the sub value back to you{NETWORK_PAYOUT_MACRO}→ network payout macro, e.g.{payment}or{payout}{NETWORK_STATUS_MACRO}→ network status macro (optional — omit if not supported)YOUR_POSTBACK_KEY→ unique key shown in your flow TDS panel
🔑 Postback Key
The postback key is a security token that prevents anyone from faking postback hits to inflate your conversion stats. Every flow has its own unique key. Copy it from the flow TDS section and paste it into every postback URL you give to the network.
🔄 Multi-Status Postback — Full Conversion Lifecycle
CPA and lead generation networks often do not report a final status in one shot. Leads go through review stages before payout is confirmed. CyberCloakTDS fully supports this multi-status lifecycle.
Supported Status Values
| Status | Meaning | Converted Flag |
|---|---|---|
new |
Lead just submitted, not yet reviewed | Not counted yet |
pending |
Under review by advertiser | Not counted yet |
hold |
On hold, waiting for more info | Not counted yet |
approved |
Confirmed payout — conversion counted | Counted ✔ |
rejected |
Lead rejected, no payout | Not counted |
trash |
Spam or duplicate lead | Not counted |
The same click_id can be hit multiple times with different statuses. Each hit updates the status in Click Logs. Conversion is only counted when status=approved.
Networks Without Status (Legacy Mode)
If your network fires only one postback and does not send a status parameter, omit &status= entirely from the postback URL. The system falls back to legacy mode — on the first postback hit, converted=1 is set immediately.
Dr.Cash Example Setup
| Event | Postback URL to add in Dr.Cash |
|---|---|
| New lead | https://cybercloak.pro/api/postback.php?cid={sub1}&status=new&key=YOUR_KEY |
| Approved | https://cybercloak.pro/api/postback.php?cid={sub1}&payout={payment}&status=approved&key=YOUR_KEY |
| Rejected | https://cybercloak.pro/api/postback.php?cid={sub1}&status=rejected&key=YOUR_KEY |
| Trash | https://cybercloak.pro/api/postback.php?cid={sub1}&status=trash&key=YOUR_KEY |
💰 Payout Tracking
Include the &payout= parameter in your approved postback URL with your network payout macro. CyberCloakTDS stores this amount in the click log row. If payout is only sent on the approved event (which is standard for most networks), just add it to the approved URL — the value is preserved across subsequent status updates.
📊 Facebook CAPI — Conversion Tracking via Meta
Beyond recording conversions in CyberCloakTDS, you can also fire a real Facebook Conversions API (CAPI) event the moment an approved postback arrives. This sends a Purchase event directly from server to Meta — no browser pixel needed, no iOS tracking loss.
Setup Steps
- Go to Facebook Events Manager → open your Pixel → click Settings
- Scroll to Conversions API → Generate a new access token → copy it
- Note your Pixel ID from the top of the page
- In CyberCloakTDS, edit your flow → scroll to Meta Conversions API section
- Paste your Pixel ID and Access Token
- Optionally paste the Test Event Code from Events Manager → Test Events tab
- Save flow and re-download index.php
How It Fires
- 🔒 CAPI fires only once per click_id — duplicate events never reach Meta
- ✅ Fires only on status=approved — never on rejected or trash
- 📤 Event type:
Purchase, includes payout as event value, visitor country, and IP - Check Facebook Events Manager → Test Events to see events processed in real time
📋 Reading Click Logs — Complete Conversion Details
Every visit to your campaign URL creates one row in Click Logs. Here is what each column tells you:
| Column | What It Shows |
|---|---|
| Click ID | Unique identifier — same value passed to the affiliate network |
| Verdict | Why the visitor was allowed or blocked: allow, bot_ua, vpn_asn, country, white_ip, etc. |
| Country / Device / OS | Detected visitor attributes used for filtering decisions |
| sub1–sub5 | Values passed by your traffic source (ad network macros like ad ID, adset ID) |
| Converted | Checked if status=approved postback was received for this click_id |
| Payout | Amount reported by the network in the approved postback |
| Status | Latest conversion status: new / pending / hold / approved / rejected / trash |
| Time | Timestamp of the original click |
🌐 Universal Setup for Any Affiliate Network
No matter which network you use, the steps are always the same:
- Find out which sub parameter name the network uses (check their docs — usually sub1, sub_id, click_id, or aff_sub)
- Add that parameter to your offer URL:
?PARAM_NAME={click_id} - In the network postback settings, add your postback URL with their click-return macro in the
cid=field - Add
&payout=THEIR_PAYOUT_MACROon the approved event URL - If the network supports multi-status, add separate postback URLs for each event
- Copy the Postback Key from your flow and include it as
&key=in every postback URL - Re-download
index.phpand re-upload to your campaign domain - Run a test click from a non-whitelisted device and verify it appears in Click Logs with a click_id
- Trigger a test conversion and verify Click Logs shows converted status and correct payout
✅ Quick Reference Checklist
- TDS enabled on flow, offers added with weights totalling 100%
{click_id}token in each offer URL using the correct parameter name for that network- Postback key copied and added to all postback URLs as
&key= - Postback URLs set in network for each status event (or legacy single URL if not supported)
- Facebook CAPI: Pixel ID and Access Token added in flow if Meta conversion reporting is needed
- index.php re-downloaded after all changes and re-uploaded to campaign domain
- Test click from non-white IP verifies click_id appears in Click Logs
- Test postback verified — Click Logs row shows converted=1 and correct payout