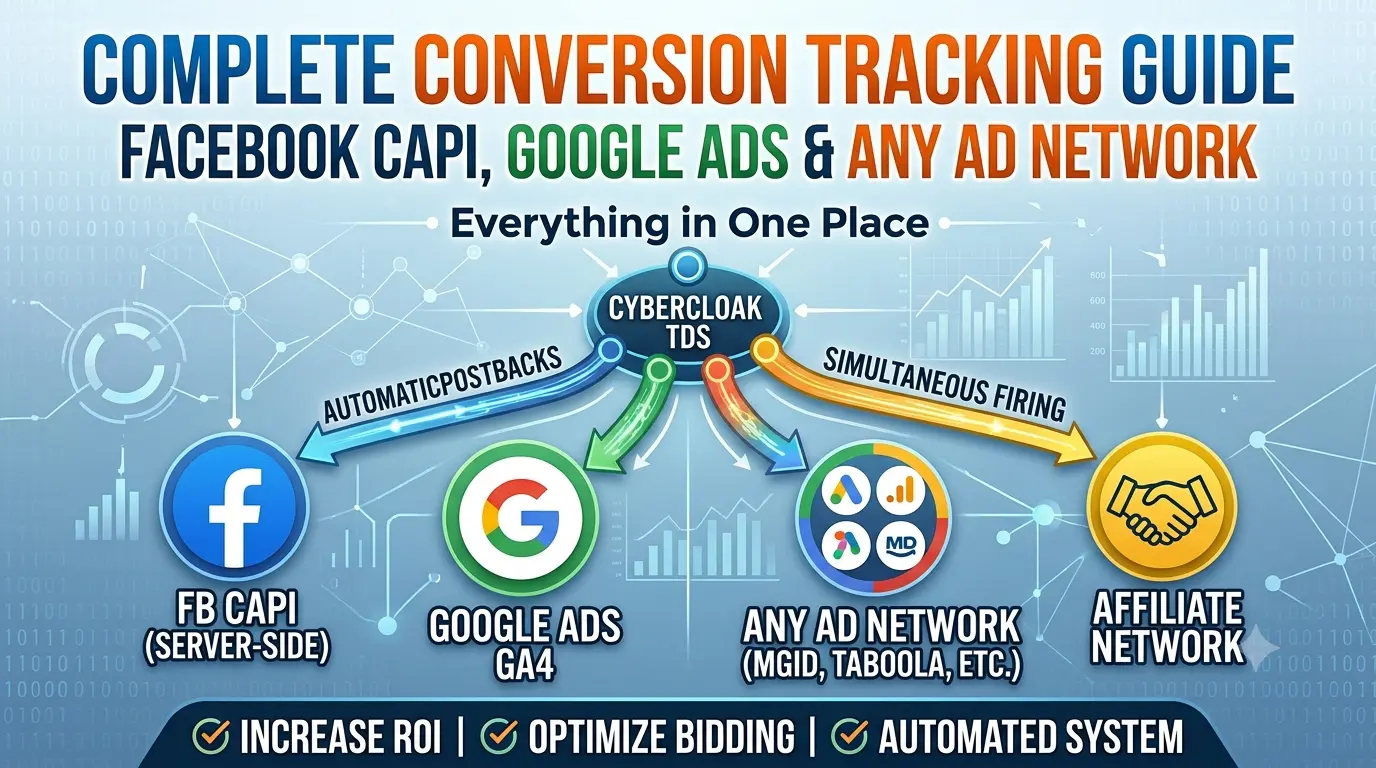
📊 Conversion Tracking — Everything in One Place
CyberCloakTDS features a multi-layer conversion tracking system. When a single conversion happens, up to four things fire simultaneously:
- ✅ Affiliate Network Postback — the network notifies your system that a conversion happened and sends the payout
- ✅ Facebook CAPI — a server-side Purchase event is sent to Meta for ad optimization
- ✅ Google Ads GA4 — a server-side purchase event is sent to Google for bidding optimization
- ✅ Ad Network Postback — MGID / Taboola / Exoclick / Outbrain is notified that their click converted
Everything happens automatically — set it up once and the system handles the rest. 🚀
🧠 How the Full System Works — Big Picture
Visitor clicks your ad (Facebook / Google / MGID / Taboola etc.)
        ↓
Campaign index.php loads
  • gclid captured from URL (Google Ads traffic)
  • sub1 stores the ad network click ID
        ↓
CyberCloakTDS checks the visitor (bot? VPN? wrong country?)
        ↓
    ✔ Real Visitor              ✘ Bot / Moderator
        ↓                              ↓
  Offer Page shown              White Page shown (safe content)
  click_id generated            No tracking fired
        ↓
Visitor lands on offer, makes a purchase
        ↓
Affiliate Network fires postback to your system:
  /api/postback.php?cid=CLICK_ID&payout=21&status=approved&key=KEY
        ↓
System automatically fires:
  ✓ Meta CAPI          (if Pixel ID + Token is set)
  ✓ Google GA4          (if Measurement ID + Secret is set)
  ✓ Ad Network Postback (if Traffic Source URL is set)
  ✓ click_logs updated: converted=1, payout=21
📱 Part 1 — Affiliate Network Postback Setup
This is the foundation of the entire tracking chain. You need to tell the affiliate network where to send their click ID so your system can match conversions back to the original click.
🔧 Step 1: Enable TDS and add the Offer URL with a click ID macro
Edit your flow → Traffic Splitting (TDS) section → toggle TDS ON. In the Offer URL field, add your affiliate link with the {click_id} macro:
https://yournetwork.com/offer?sub1={click_id}
⚠️ Each affiliate network uses a different parameter name for tracking. Here are the most common:
| Network | Add to Offer URL | Use in Postback URL |
|---|---|---|
| Dr.Cash | ?sub1={click_id} |
cid={sub1} |
| AdCombo | ?sub1={click_id} |
cid={sub1} |
| MaxBounty | ?s1={click_id} |
cid={s1} |
| ClickDealer | ?clickid={click_id} |
cid={clickid} |
| PropellerAds | ?click_id={click_id} |
cid={click_id} |
🔗 Step 2: Set the Postback URL in your affiliate network
Copy the Postback URL from your flow's Conversion Tracking section. It looks like this:
https://cybercloak.pro/api/postback.php?cid={sub1}&payout={payment}&status={status}&key=YOUR_KEY
Paste this into your affiliate network's S2S Postback / Global Postback settings. The network will automatically replace their macros when a conversion occurs.
📊 Status-Based Networks (Dr.Cash, AdCombo, CPA networks)
Some networks send multiple postbacks for the same conversion — New → Pending → Approved / Rejected. For these networks, set up 4 separate postback URLs:
New:          ...?cid={sub1}&status=new&key=KEY
Confirmation: ...?cid={sub1}&payout={payment}&status=approved&key=KEY
Rejection:    ...?cid={sub1}&status=rejected&key=KEY
Trash:        ...?cid={sub1}&status=trash&key=KEY
✅ Facebook CAPI and Google GA4 fire only when status = Approved. Duplicate protection is built in — each fires just once per click.
📘 Part 2 — Facebook / Meta CAPI Setup
Meta Conversions API is server-side tracking — it bypasses ad blockers and iOS privacy restrictions, delivering real purchase events to Facebook without relying on the browser pixel.
🔧 Setup Steps:
- 📱 Open Meta Events Manager → select your Pixel → click the Settings tab
- 🔑 Under the Conversions API section, click "Generate Access Token"
- 📋 Copy the token
- ⚙️ Edit your flow → Meta Conversions API section → fill in:
- Pixel / Dataset ID — e.g.
1185020627010888 - Access Token — the token you just copied
- Test Event Code — optional, for testing only (e.g.
TEST61697)
- Pixel / Dataset ID — e.g.
- 💾 Save the flow
🧪 How to Test Facebook CAPI:
- Open Meta Events Manager → Test Events tab
- Copy your Test Event Code → paste it into the flow
- Click your campaign link from a non-whitelisted IP (real traffic, not white IP bypass)
- Manually fire a postback or wait for the affiliate network to send one
- You should see a "Purchase" event with status "Processed" in Events Manager ✅
🎯 Part 3 — Google Ads Tracking Setup
Google Ads tracking has two independent components — both are optional and work separately:
- 📊 GA4 Measurement Protocol — fires a server-side purchase event on Approved postback (accurate CPA conversion tracking)
- 🖱️ gtag Click Event — fires when a real visitor passes cloaking checks (signals traffic quality to Google Ads for bid optimization)
🔧 GA4 Setup (Accurate CPA Conversion Tracking):
- 📊 Open Google Analytics → Admin → Data Streams → select your stream
- 🆔 Copy your Measurement ID (format: G-XXXXXXXXXX)
- 🔑 Scroll down to "Measurement Protocol API secrets" → click Create → copy the secret
- 🔗 Link GA4 to Google Ads — Google Ads → Tools → Linked accounts → Google Analytics
- ⚙️ In your flow's Google Ads Tracking section, fill in:
- GA4 Measurement ID — G-XXXXXXXXXX
- GA4 API Secret — the secret you just created
🔧 Google Ads Conversion ID + Label (Click Quality Tracking):
- 💰 Open Google Ads → Tools & Settings → Conversions → select your conversion action
- 🏷️ Copy the Conversion ID (AW-XXXXXXXXX) and Conversion Label
- Paste both into the flow's Google Ads Tracking section
📡 Part 4 — Ad Network Postback (MGID, Taboola, Exoclick, Outbrain)
This feature notifies your traffic source (ad network) when a conversion happens — so they can optimize their bidding and send you better quality traffic over time.
🔧 Setup in 2 Steps:
Step 1: Pass the ad network's click ID into sub1 in your campaign URL:
| Ad Network | Add to Campaign URL |
|---|---|
| MGID | ?sub1=[CM_CLICK_ID] |
| Taboola | ?sub1={click_id} |
| Exoclick | ?sub1=[CLICK_ID] |
| Outbrain | ?sub1={{ob_click_id}} |
| PropellerAds | ?sub1={click_id} |
| RichAds | ?sub1={click_id} |
Step 2: In your flow's Ad Network Postback URL field, paste the network's conversion postback URL using macros:
| Network | Postback URL |
|---|---|
| MGID | https://a.mgid.com/postback?cm={sub1}&payout={payout} |
| Taboola | https://trc.taboola.com/actions-handler/log/3/s2s-action?click-id={sub1}&rev={payout} |
| Exoclick | https://engine.exoclick.com/conversion.php?click_id={sub1}&amount={payout} |
| Outbrain | https://tr.outbrain.com/unifiedPixel/conv?ob_click_id={sub1}&orderValue={payout} |
🧰 Supported Macros in the Postback URL:
{sub1}through{sub5}— values passed in the campaign URL (ad network click ID){click_id}/{cid}/{clickid}— internal CyberCloakTDS click ID{payout}/{revenue}/{commission}/{price}/{payment}— conversion payout amount{status}— conversion status (approved){gclid}— Google Click ID (for Google Ads traffic)
🧪 Part 5 — Testing Guide
📋 Step-by-Step Testing Checklist:
- 📱 Click your campaign link from a non-whitelisted IP
- 🔍 Check Click Logs — a new row should appear with:
- Verdict: Safe and Page: Offer
- Click ID: generated (e.g.
6a27b0e114319d) - Sub1: ad network click ID (if traffic came from an ad network)
- gclid: Google Click ID (if traffic came from Google Ads)
- 📡 Fire a manual postback — open this URL in your browser:
https://cybercloak.pro/api/postback.php?cid=CLICK_ID&payout=10&status=approved&key=YOUR_KEY
Expected response:{"status":"ok","message":"Conversion recorded"} - ✅ Check Click Logs again — the row should now show:
- Conv column: ✓ green tick
- Status badge: Approved (green)
- Payout: $10.00
- 📊 Verify Facebook CAPI — open Meta Events Manager → Test Events tab → a Purchase event should appear
- 📈 Verify Google GA4 — open Google Analytics → Admin → DebugView → look for the purchase event
- 📝 Check debug.log on the server at
logs/debug.log— all events are logged here:[CAPI]— Meta CAPI response (look forfbtrace_id= success)[GA4]— Google GA4 response[TrafficPB]— Ad network postback response (look forresponse=OK)
🚨 Common Issues & Fixes
| Problem | Reason | Fix |
|---|---|---|
| Postback returns "Click not found" | cid value does not match any click_id in the logs | Make sure {click_id} macro is correctly set in the Offer URL. Copy the exact click_id from Click Logs for manual testing. |
| Postback returns "Invalid key" | Postback key mismatch | Copy the Postback Key exactly from your flow settings — no extra spaces. |
| Meta CAPI event not appearing | Wrong Pixel ID, expired Access Token, or incorrect Test Event Code | Regenerate a fresh Access Token in Events Manager. Verify the Test Event Code matches exactly. |
| Conversion counting twice | Multiple approved postbacks for the same click_id | This is expected behavior for status-based networks. CAPI and GA4 are guarded — they fire only once per click. Check capi_sent and ga4_sent columns in Click Logs. |
| Testing from white IP — nothing tracks | White IP bypass skips TDS routing — no click_id generated | Remove your IP from the White IP list for testing, or test from a mobile network. |
| Ad network postback not firing | Traffic Source Postback URL field is empty or macros are wrong | Check logs/debug.log for [TrafficPB] entries. Verify the URL format and that sub1 is being passed in the campaign URL. |
| index.php changes not taking effect | index.php is generated at download time, not live-synced | After any flow setting change, re-download index.php from the flow row and re-upload to your campaign domain. |
🏆 Pro Tips
- 📊 Stack all tracking layers — Meta CAPI + Google GA4 + Ad Network Postback can all be active on the same flow simultaneously
- 🔄 Use status-based tracking for Dr.Cash, AdCombo and similar CPA networks — set up all 4 postback URLs (new, confirmed, rejected, trash). Rejected and trashed conversions will never trigger CAPI or GA4.
- 💰 Payout is preserved automatically — if a pending or hold ping arrives without a payout value, the system keeps the previously stored payout
- 🧾 Monitor debug.log regularly — every CAPI, GA4, and ad network postback response is logged there for quick troubleshooting
- ⚡ Always re-download index.php after changing flow settings — the file is baked at download time and does not sync automatically to your campaign domain
- 🔐 Postback key is your security layer — always set it and include it in all postback URLs. Without it, anyone who knows your click_id could fake conversions.